4YourFamilyStory.com
  • Home
  • Blog
  • Services
  • Resources
    • Research Resources
    • Getting Started with Genealogy
    • Organize Your Genealogy with Onenote
    • Organize Your Genealogy With Evernote
    • How do I make a Family History Site with Weebly.com?
    • How do I make screenshots & annotations?
    • Texas Genealogy
  • About
    • Welcome!
    • Where Else I Can Be Found Online
    • Disclosure
    • Privacy Policy
    • Terms of Service
  • Connect

Find your family story.

GoodReader & GeniusScan+ Makes Researchers Smile

2/29/2012

16 Comments

 
Picture
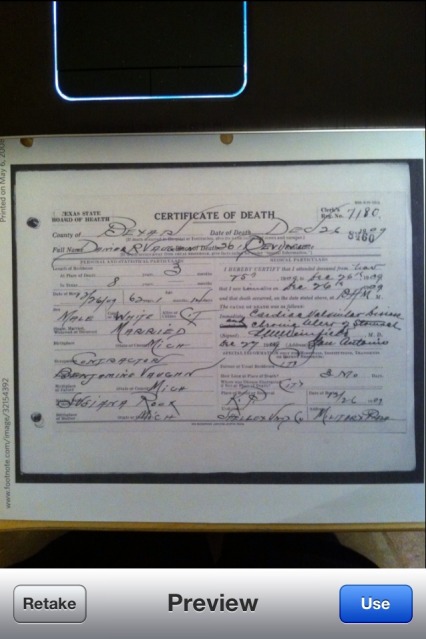
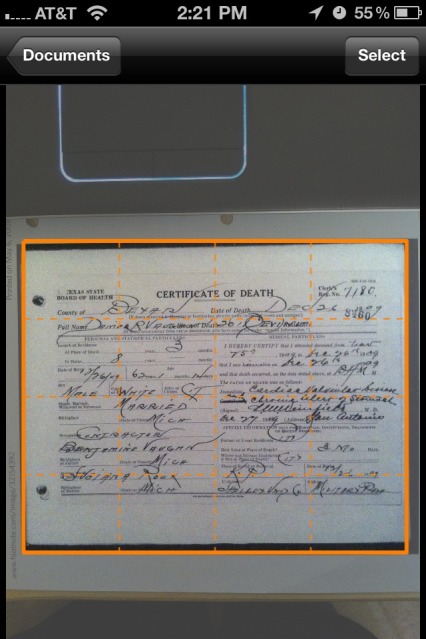
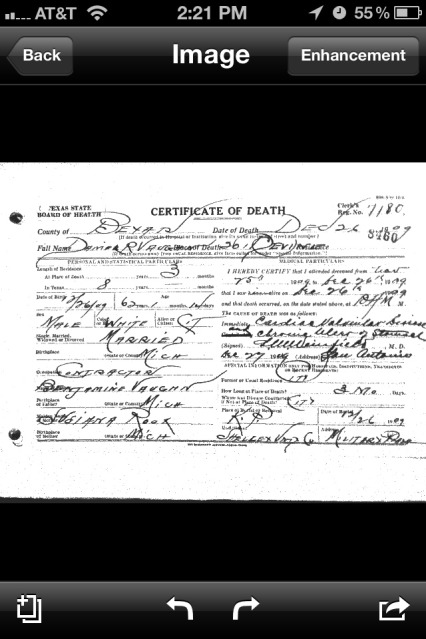
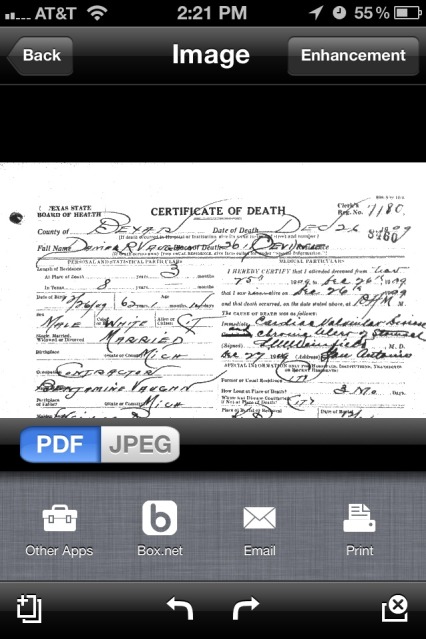
For those researchers who use their iPhone and an online cloud storage service [like Evernote or DropBox] to scan and store documents, there is one main complaint. If you scan [or take a photo of] a document, you're not able to attach any notes to it or citation information. Well, I've found two apps that work together to help you with this process. So. This is a 2 app how-to / review. [Lucky you cuz it's a long post.. But? It has pictures.] The first app is a scanner app called GeniusScan+, and the second is GoodReader which is a PDF reader app with some pretty rockin' annotation capabilities. I'll go over the scanner first, then the PDF reader, which is the exact workflow you would use when you're out and about collecting documents.

Before we get started, this how-to / review assumes you have downloaded [bought] both of these apps.

GeniusScan+
This thing really is a genius. There's a free version but it doesn't support exporting to the cloud [boo], but the one that can export to the cloud is well worth it's price. Once you've uploaded the app here are the steps to scan a document, photo, or book:
  • You have the option of either taking the photo of the document within the app itself or of choosing a photo from your iPhone library that you already took with the camera on your iPhone.
  • Once you take the photo [or choose one from the library], you're shown a preview screen. Retake if you need to or if it's good, select Use.
  • In the next screen you can tidy up the edges of the document just by using your finger to adjust the orange guide perimeter thingies [technical verbiage] then press Select.
  • Then it automatically enhances the image for you, making the white areas whiter and the black areas blacker. It also seems to square it up as well.
  • Then select the export button [rectangle with arrow] in the bottom right hand corner of the iPhone screen.
  • On this screen, you can select whether you'd like to export it as a JPG image or as a PDF document. I went with the PDF route simply because I already know I'm sending it to a PDF reader. But? The PDF reader that I'm sending it to can take any type of file including JPGs. [It's beast.]
  • Then since we want to export it to the PDF reader, GoodReader, select Other Apps [toolbox icon].
  • In next screen, select Actual.
  • Then you'll see a scrolling list of other apps that you have on your iPhone that you could export this PDF document to. We're exporting to GoodReader, so select GoodReader.
  • The next screen shows your PDF document in the GoodReader app ready for annotating. Like magic.
Below is a gallery of screenshots. I tried to capture as many of the steps as possible. And they are in order from left to right. Just click on a thumbnail to see the full images with captions. =)

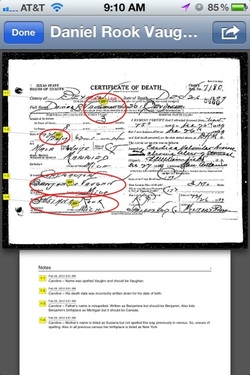
GoodReader
The document that I've used for this demo is a copy of my 2nd great grandfather's death certificate. I downloaded it from FamilySearch.org, but we're going to pretend that I scanned it. There are several things I know that are not correct on there, or at the very least things I need to look into. So. I want to mark them, write down a quick note, and place the citation info on the bottom of it so that I can go back later and create the full citation. [You know, to be a good little genealogist. =) ] Following are the steps to do this:
  • When I tap the document with my finger, a screen comes up asking me if I want to annotate the document ["Save to this file"] or make a copy of the document first and then annotate the copy. I choose "create an annotated copy" because I want to keep a clean copy of the document. [And I'm a Photoshop kinda gal, and you never mess with the original.]
  • [Note: At any time while you're annotating the document, there are 2 menus that you can access: the Main Menu and the Annotation Menu. By tapping the center of the screen quickly, you will pull up the the Main Menu. After a little while the Main Menu hides until you tap the screen again. By touching the screen and holding it down for just a few seconds brings up the Annotation Menu. Also, I found it easier to do everything with the iPhone in landscape mode.]
  • You then can crop the document. But? We already did that in the GeniusScan+ app. So we're good to go.
  • The first thing I want to notate is the discrepancy in the spelling of his last name. Visually, I want to circle his last name. By placing my finger on the screen and holding it down makes the Annotation Menu come up. I choose the oval shape on the right of the menu. I size it up to fit his last name Vaughn and center it over his name. When I'm happy with the placement, I tap Done with my finger.
  • Now, I'd like to attach a note to it, but without writing over the document. I hold down my finger outside the oval [outside, not inside] and the Annotation Menu comes up. I select the Dialoge Icon and a yellow screen and my keyboard appear so I can type a note on it about his surname. When I'm done, I tap Save.
  • What is now on top of the document is a yellow dialogue icon and if I tapped it, it would take me back to the note. However, the icon is not in the correct place. I want it inside the oval. So press and hold down your finger on the yellow dialogue icon. What appears are options for the icon. I tap Move. Then I drag the dialogue icon to inside the oval and then tap Done Moving. [Not really rocket science & it's much easier than me typing these instructions. I promise.]
  • I repeat the process for each note I'd like to make. [And they made quite a few mistakes on his death certificate.]
  • Now. Because I want to place the citation directly on the document but in the margin, I drag with my finger the document so that I can see the margin. Then I place and hold down my finger in the margin area until the Annotation Menu appears. I tap the icon with 'abc' on it. Then I type the citation information and then press Save.  If I hold down my finger on the text, the text menu appears where I can change the font size, font color, etc.
  • When I'm done making annotations, I tap the middle of the screen to bring up the Main Menu.
  • I tap the Export Icon [rectangle with arrow], then a Select Action Menu appears. I choose Open In.
  • The Open In Menu appears and I can either save the file 'as is' or 'flatten annotations'. I choose Flatten Annotations. [Why? Because I'm a Photoshop kinda gal & when uploading to the web, flattened files are smaller. And that's the way I roll.]
  • Then a scrolling menu appears listing all the apps I could export this flattened annotated PDF file to. I scroll down and choose Evernote. [However, I could've just as easily have chosen Dropbox.]
  • It then appears in my Evernote App right before my eyes. Then because my Evernote iPhone app syncs with my online Evernote which then syncs to my desktop Evernote, my annotated flattened PDF copy of my 2nd great grandfather's death certificate and the annotation notes that I added appear in all my Evernote places. Like magic. And what does magic look like?
Like this:
Below is another gallery of screenshots, but this time it's of the GoodReader App screenshots. Again, I tried to include as many steps as possible. And they are in order from left to right.

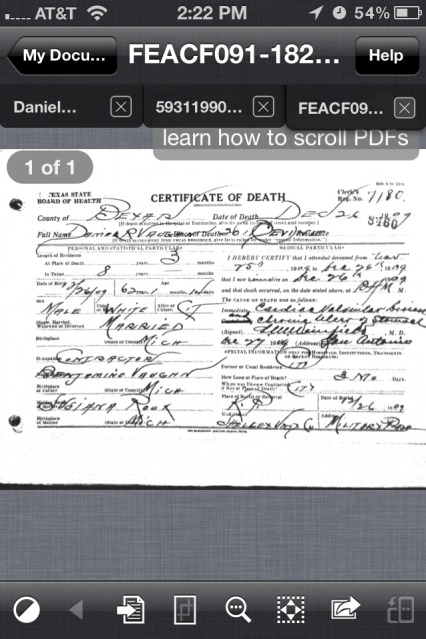
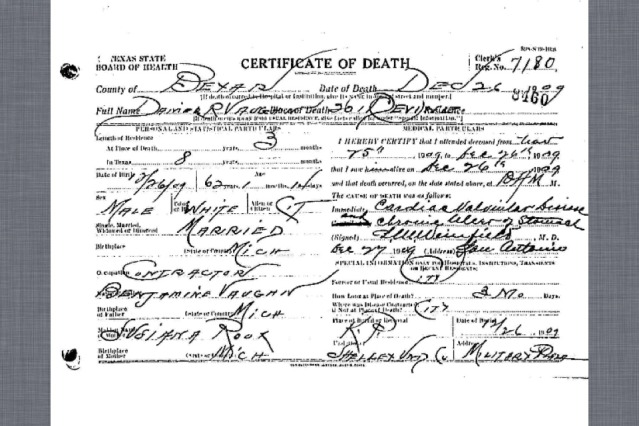
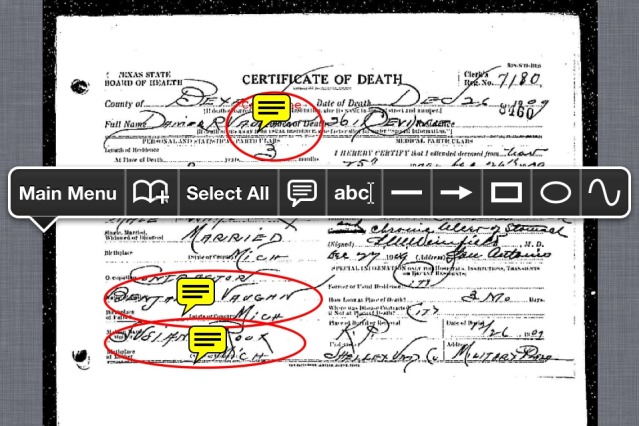
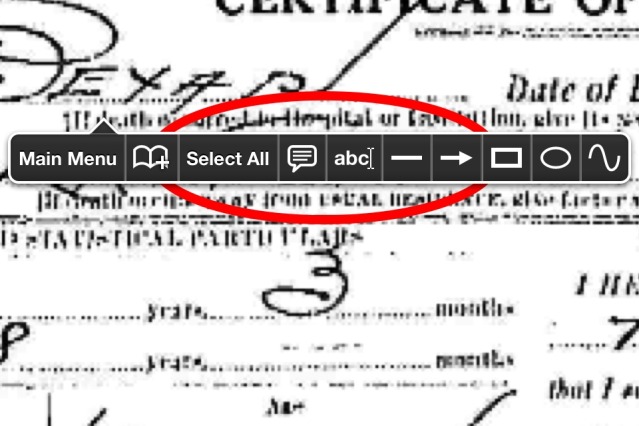
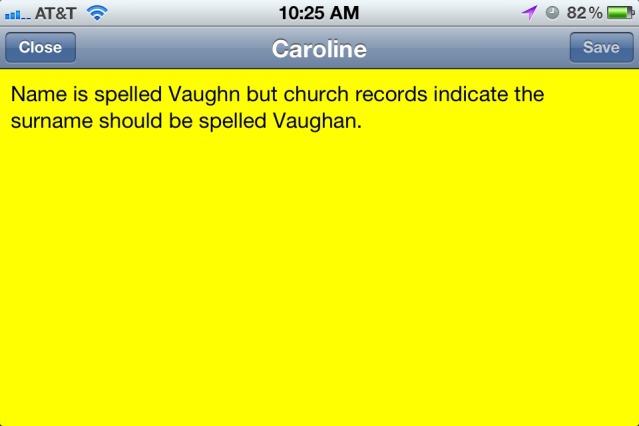
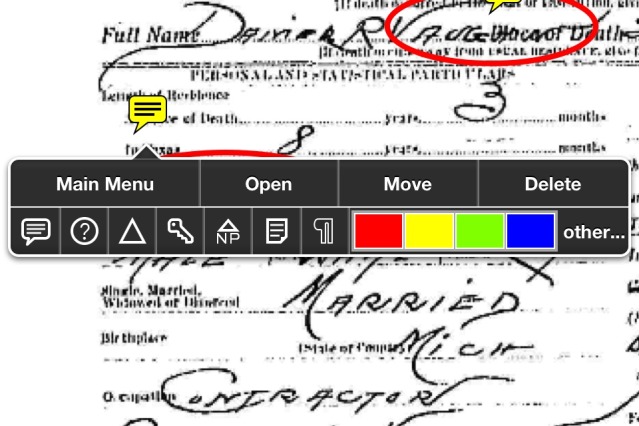
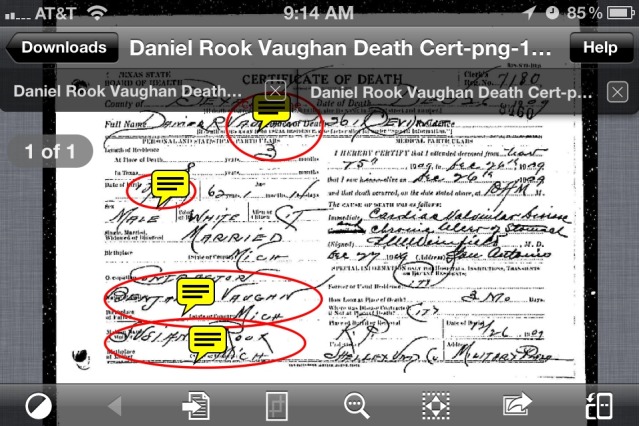
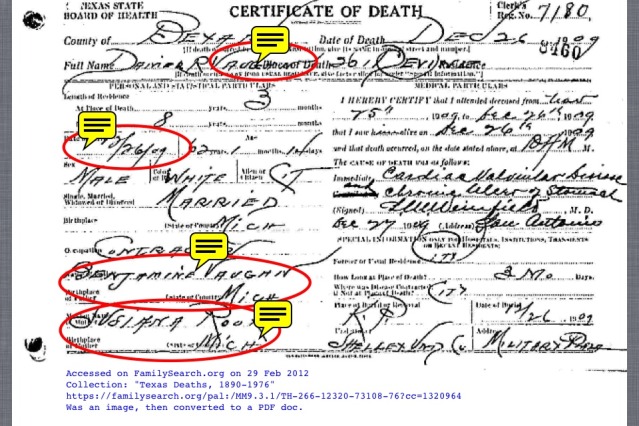
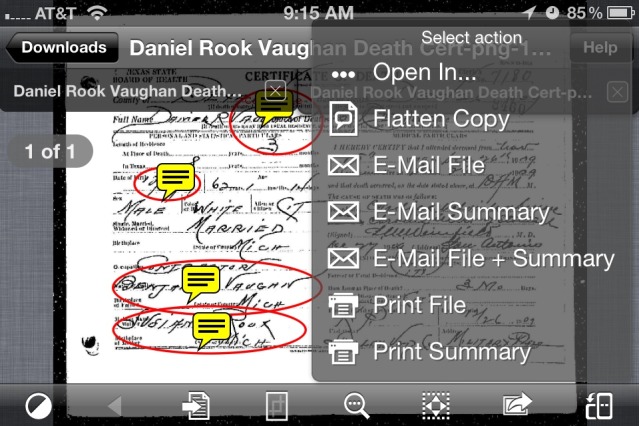
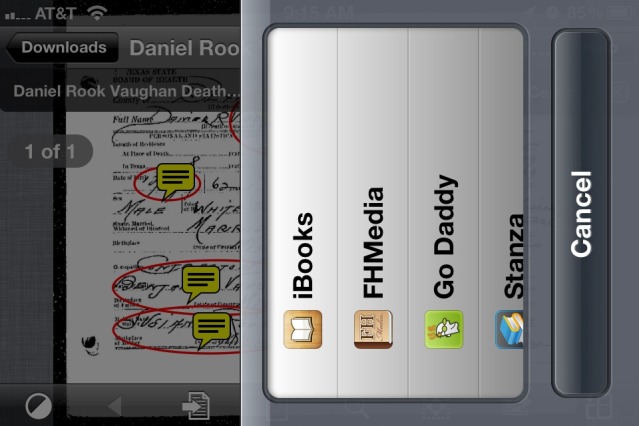
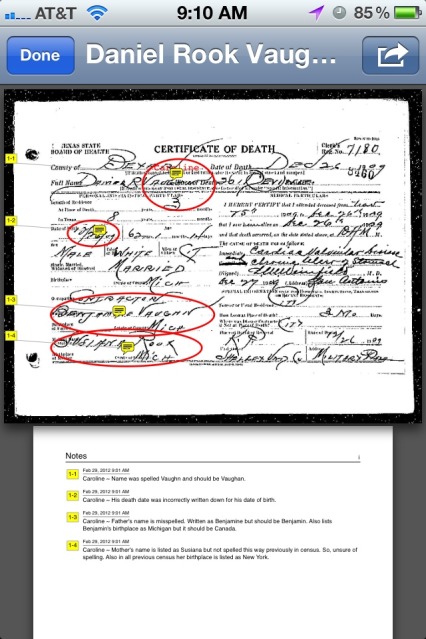
If I had just wanted to add citation information, I could have just done that. Also, I could've put the citation information in a sticky note. There are a lot of options with GoodReader and my example above is just one way you can use it. GoodReader has the following features:
  • Able to import & view any type of media whether it be images, text files, documents, complete ebooks, audio, video, etc. from anywhere, like Microsoft Word, Google Docs, Safari, an app like GeniusScan+ [like above], Evernote, Dropbox, Box.net, email attachments, etc.
  • Speaking of complete ebooks, have a book that your family is in, but you wanna take some notes in the ebook? Yeah. Import that ebook and annotate to your heart's content.
  • Been wishing you had some type of file system on your iPhone or iPad? [Cuz, wow. It's got a kinda anti-file system going on?] Look no further. GoodReader has an excellent file management system, and then the files are accessible to your other apps.
  • A friend says, "Hey, can you take a look at this thing I wrote in Google Docs and tell me what I need to do differently? It's, like 10,000 pages about my life." No problem [OMG] with GoogleReader. Just import that puppy and tear it to shreds with the annotation menu. And? Do it in red. Then send it right back to Google Docs. Or anywhere...just because you can.
  • Need to do some cropping? No problem, it can do that too. [In our example above, however, we cropped the black margins off in the GeniusScan+ app. Because why not?]
  • You can do file transfers through iTunes, iCloud, wifi sharing, Apple idisk, Dropbox, SugarSync, GoogleDocs, FTP servers, etc.
Below are the features of the GeniusScan+ app:
  • Scan any document, photo, business cards, receipts, etc.
  • Auto-senses the edges of the document and then you can very easily correct it some more if needed.
  • Auto-enhances the image ~ both black & white as well as color images.
  • Auto-corrects the perspective so that your scanned image looks just like it was scanned the old fashioned way.
  • Can convert it to JPG or PDF.
  • Then can upload to email, Twitter, Facebook, Evernote, Dropbox, Google Docs, Box.net, and Expensify.
  • And it also supports Wifi sharing.
[Did you see that? It's integrated with Twitter! Woo-hoo!]


The Bottom Line
These are some pretty awesome apps that can really help a researcher out when they're on the go. [And who's not these days?] However, they aren't free. But? They're cheap. Here's the lowdown on where you can find them, how much change you need to look for in your couch [or sofa if you're a sofa person. I'm not, so...] cushion so you can purchase them, and what kind of devices you can get them on:

GeniusScan+
  • Available on the iPhone, iPod touch, and iPad. And it requires iOS 4.0 or later.
  • Can be bought in iTunes or the App Store on your device.
  • Costs a whopping $2.99.
  • You can check it in iTunes Preview for iPhone and iPad.
GoodReader
  • Available on the iPhone, iPod touch, and iPad. And it requires iOS 4.0 or later.
  • Can be bought in iTunes or the App store on your device.
  • Costs a whopping $4.99.
  • You can check it out on the iTunes Preview for iPhone or the iTunes Preview for iPad.
~Caroline
16 Comments
Lynn Palermo link
2/29/2012 11:38:47 pm

Fantastic Caroline, I love this! Thanks for all the hard work on this one.

Reply
Caroline Pointer
3/1/2012 12:05:57 am

The apps are WAY easier to use than it was to actually write out the instructions [and do all those screenshots]. So many times I do reviews of non-genealogy apps and then suggest ways to use them in research, but not how. So. Here's the how. I'll be showing some more how's with these apps minus the step-by-step instructions.

Thanks for reading and commenting, Lynn! =)

~C

Reply
Diana Ritchie link
3/1/2012 12:18:32 am

Thanks!! I've been playing around with my iPad and wanting it to be what I take on research trips so I don't have to lug my laptop along. This is definitely a HUGE step in the right direction. I'll be going to the ACPL at the end of March...so that will be my test. Thanks for all the great info here AND all the step by step instructions...I need that :-)

Reply
Caroline Pointer
3/1/2012 02:28:44 pm

Thanks, Diana! Have a great trip, and lemme know how it works for you on the iPad. It'll be nice with all the screen real estate.

Thanks for reading and commenting!

~C

Reply
Lynne Carothers
3/9/2012 01:31:34 pm

Do you have any idea if these will be available for Android tablets?

Reply
Caroline M. Pointer
7/4/2012 02:09:12 am

Lynne,

Genius Scan is available on the Android OS and the Windows Phone now according to their site:

http://www.thegrizzlylabs.com/genius-scan/

And according to GoodReader's site, they've no plans to do anything but iOS:

http://www.goodreader.net/gr-android.html

Hope this helps! And thanks for reading. =)

~C

Reply
Malissa R
6/29/2012 04:33:13 am

Caught your link after you posted on the listserv! I'm a fairly new iPhone user and when my digital camera died recently I started using it at repositories. This really helped me take it to a new level and I'm loving it!

Reply
Caroline M. Pointer
7/4/2012 02:10:42 am

Malissa,

Thank you! I'm glad it helped you and your research. =)

Thanks for stopping by and reading. I really appreciate it. =)

~C

Reply
Cathi Desmarais link
7/4/2012 03:08:56 am

I used the camera within Evernote to take photos of the projected image from a microfilm reader. It worked pretty well, except that I wasn't sure about getting the image out of Evernote afterward. (There is probably a way to do that but I don't know how.) After reading this, I think it would work better to use Genius Scan to take the photo and then could export the image to Evernote and still have the image in Genius Scan to export again to DropBox or GoodReader or wherever I wanted. I'm going to try it out! Thanks for a great tutorial.

Reply
Caroline M. Pointer
7/4/2012 04:00:21 am

Cathi,

Thank you! I use OneNote instead of Evernote. [And I did some video tutorials on using it for genealogy with more to come.] Also, I wrote a bit about Evernote and its limitations when it comes to genealogy, depending on your online workflow process. I, also, though, touched upon genealogy software's limitations as well when it comes to online research workflow processes. I'm a firm believer of not attaching one's self to a certain type of technology. It evolves fast, and there's always someone trying to outdo the other. That can work to our advantage. The key is to keep our data in a neutral place at the same time, like on an external hard drive. The link to the Evernote post is here:

http://www.4yourfamilystory.com/1/post/2012/03/problems-with-evernote-and-genealogy.html

Thanks, Cathi, for stopping by and reading. I appreciate it! =)

~C

Reply
Ginger Smith link
7/16/2012 02:49:00 am

Hi Caroline, this is great! I'm so glad I caught this. Unfortunately I'm still on the Android Platform, looking to switch to iPhone though. Loved the how to and the screenshots. You are really great at this! I had a quick question. In the GeniusScan+ you said you cropped out the black stuff. Did that automatically leave enough margin for the citation? Or did you have to specifically remember to keep enough white space for it? I always forget to do this...Thanks!

Reply
Caroline M. Pointer
7/16/2012 03:54:11 am

Thanks, Ginger! To answer your question, I just cropped out the black margin leaving the white space of the death certificate which was plenty of room to add the citation.

Thanks for stopping by and reading, Ginger! =)

~C

Reply
Liz Stratton link
2/22/2013 02:10:36 am

Excellent post! Thanks for mentioning it. This is EXACTLY what I want to do. I've added you to my feed reader.

Reply
Caroline
5/1/2013 04:00:05 am

Thanks Liz. I'm glad you found it helpful.

Also, thanks for stopping by. I appreciate it. =)

~C

Reply
Kathleen link
12/7/2013 06:25:16 am

Thanks so much for this step-by-step review, Caroline. I can't tell you how many times I have wanted to do this!

Reply
Nancy Caton
5/18/2014 04:08:06 am

Thanks! For a quick citation I print the details on a piece of paper and scan that as a second page in the PDF. I'm using Camscanner and abbyy's scanner. I send to Evernote via email - that works as well for me. I like the whole annotation thing though. Might be cool to have the original as a tif, and then put original with citation and red line jpg all in the same PDF.

Reply


Leave a Reply.

    Categories

    All
    48 Hr Ephemera Challenge
    Arizona
    Beginner Series
    Book Reviews
    Conferences
    DAR
    DNA
    Genealogy Fun
    Genealogy On TV
    G+ Genealogy Research Community
    G+ Tech For Genealogy Community
    Heritage Crafts
    History Saturday
    Marriage Records
    Mexico
    New Mexico
    New Records
    Organizing Tips
    Press Releases
    Research Tips
    Shades Of The Departed
    Speaking
    Sunday Scanday
    Tech Tips
    Things You Need To Know This Morning
    What's Up Genealogy? Show

    Archives

    February 2017
    January 2017
    May 2016
    April 2016
    January 2016
    December 2015
    November 2015
    October 2015
    April 2015
    March 2015
    November 2014
    October 2014
    July 2014
    June 2014
    May 2014
    April 2014
    March 2014
    February 2014
    January 2014
    December 2013
    November 2013
    October 2013
    September 2013
    August 2013
    July 2013
    June 2013
    May 2013
    April 2013
    March 2013
    February 2013
    January 2013
    December 2012
    November 2012
    October 2012
    September 2012
    August 2012
    July 2012
    June 2012
    May 2012
    April 2012
    March 2012
    February 2012
    January 2012
    December 2011
    November 2011
    October 2011
    September 2011
    August 2011
    July 2011
    June 2011
    May 2011
    April 2011

About
Blog
​
Connect
Picture
Privacy
Disclosure
Terms of Service
© Copyright For Your Family Story 2016 - All Rights Reserved
Photos used under Creative Commons from contemplicity, ArchiM, MAURO CATEB, Marco Bellucci, DafneCholet, Outburner, louis konstantinou, laffy4k, foistclub, Phil Monger, epictures ... on & off, fontplaydotcom, Crystl, Patricia Figueira, Andrew Michaels, Daisyree Bakker, jking89, Jan Krömer, clicksense, justinbaeder, Kara Allyson, *sax, Blue Bunny® Ice Cream, mrmanc, mdanys, katmary, euthman, MelGX, Roadside Guitars, donjd2, Victori∀, quinn.anya, law_keven, Aidan Jones, Brocco Lee, lrargerich, Mike Licht, NotionsCapital.com, Nadia Szopinska, Varin Tsai, ClaraDon, Jinx!, the Italian voice, GirlReporter, Peter, mrmanc, Navin75, SantaRosa OLD SKOOL, Rodrigo_Soldon, rharrison, 04deveni, Flashy Soup Can, lizzelizzel, ericmay, flossyflotsam, SMercury98, Tambako the Jaguar, trint, themaum, Robert S. Donovan, Ian Sane, Keith Williamson, owlpacino, joshparent, ellenm1, leppre, ivanpw, buba69, bastique, Mike Licht, NotionsCapital.com, jpockele, Robert Couse-Baker, aesop